One of the best, if not the best, accessory for the Kamado Joe grill is their rotisserie system, dubbed the "Joetisserie". This device allows you to turn your Kamado Joe into a fully functional rotisserie system. The reason this is important is that in my opinion, the absolute best way to grill poultry and select meats is by spit roasting. When you grill, smoke or roast, the food stays in a static position, allowing smoke and heat to either hit it from the bottom, or, wrap around it in a convection air flow.
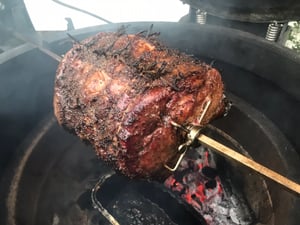 When you are spit roasting on a rotisserie, the meat spins so all sides are exposed to the heat coming from the bottom of the grill. Yet, the spinning motion also allows the meat to self-baste in its own juices, creating a juicier, more flavorful cook.
3 Best Practices for the Joetisserie
Just as when you cook normally on a kamado style grill, there is a learning curve involved when using the Joetisserie. I have owned a Kamado Joe for 5 years and have used the Joetisserie for around 4 years, so I speak from experience. Here are 3 pointers to flatten out that learning curve...
1 - Truss Tightly
Whatever you are cooking (especially poultry), make sure it is trussed properly with butcher string. I have had numerous chickens come undone from a loose truss, which lead to wings and drumsticks flailing about as the Joetiss spun. This will not only tax the motor, but will also create fodder for massive flareups as the flailing wing or drumstick will drip juices unabated onto the coals. This is not just the rule for poultry - if you are spinning a beef or pork tenderloin the same logic will apply. Keep it wrapped/trussed tight and let gravity do the work
2- Make Sure Your Forks Are Tight
Another tip regarding setup - the vast majority of the problems I have encountered using both the Joetisserie and rotisseries on gas grills is that the forks start to loosen and chaos ensues. You can take a look at the following video which detailed a cook I did on my Alfresco gas grill where the rotisserie forks became loose, the chicken flopped down half way onto the grates, thus impeding the ability to spin, and the quickly accruing juices created a bonfire in my grill. The best way to tighten forks is to start by hand and then get a needle nose plier to continue turning till its extremely tight. You also want the fork prongs to penetrate deeply into the meat, with none of the 4 prongs hanging in the ether - each one should be firmly embedded.
3 - Close Your Air Hatches Tighter
The Joetisserie sits between the lid and the top rim of the Kamado Joe. This means that you don't get the same airtight seal as if the grill was normally closed. Also, the Joetisserie needs to allow the spit to thread through the grill so there is an opening on both sides, which while small, will still allow air to seep into the grill. That means that your top vent and the bottom vent need to be shut a bit tighter than you normally would leave them. This is especially true of the bottom vent which drives the internal temp of the grill more than the top vent. If you do not have close control over your air, your temps will start rising quickly and once you overshoot your temperature, it will take up to an hour or more to bring the temperature down.
The Joetisserie certainly has a learning curve but when you taste the food after it has been spun over a live fire in your Kamado Joe, there is simply no turning back - you will be a full-fledged Joetisserie addict!
While you're learning, check out these 4 ways to elevate your grilling on the Kamado Joe.
If you have any questions about using the Joetisserie or any other Kamado Joe accessory, please email me or call the Ring of Fire showroom at 914-361-1837.